

Oversized glass walls can transform a building with daylight, open sightlines, and a seamless connection to the outdoors. A single panel can also weigh far more than a team could safely lift by hand, and it can be damaged by a small impact, a slight misalignment, or a gust of wind. Oversized glass wall installation succeeds or fails mostly before the glass reaches the site, through accurate measurements, a clear delivery route, and a documented lifting plan.
Large glass panels need precise measurements, specialized handling equipment, and trained crews because their size magnifies every small error. An opening that is slightly out of tolerance, an unsuitable suction lifter, or a rushed alignment can crack a panel or compromise its seals. This guide explains how glazing contractors prepare for large-format glazing, move and set panels, and inspect the finished work. It is general guidance, not a substitute for an engineered lifting plan, structural calculations, or manufacturer instructions.
What Makes Oversized Glass Walls Different From Standard Glass Panels?
Oversized glass panels involve far more than just increasing the dimensions of standard glazing. Once a panel reaches a certain scale, installation typically requires specialized lifting equipment, carefully calculated structural support, and a more comprehensive installation process than an ordinary window.
Panel Size, Weight, and Handling Challenges

Glass is dense, and weight rises quickly with area and thickness. Laminated glass panels and insulating glass units (IGUs, sealed units with two or more panes separated by a spacer) are heavier still. Because a large panel is awkward to grip, its weight is hard to control once it is moving.
Handling therefore depends on mechanical aids. Installers review the panel’s dimensions, weight, and lifting points before choosing equipment, and they do not rely on “it looks manageable.”
Why Large Glass Panels Are Vulnerable During Installation
Although glass can withstand substantial compressive forces, its edges are particularly vulnerable to chips, cracks, and other forms of damage. Chips, scratches, or tiny flaws on an edge can concentrate stress and later grow into cracks. This is especially true for tempered safety glass, which can shatter entirely if its surface or edge is compromised.
Large panels also flex when lifted, and they can twist if supported unevenly. Contact with metal, concrete, or tools during setting is a common source of hidden edge damage. Professionals treat every edge as a vulnerable surface from delivery to final sealing.
How to Prepare a Building for Oversized Glass Wall Installation
Most installation problems start with preparation. A thorough pre-installation review often prevents the issues that cost the most time later. Before installation begins, it is important to check the building’s structural condition, windows, and other key components. A detailed home inspection checklist for buyers can help homeowners understand which areas of a property may need professional attention before major improvements.
Measuring the Opening and Checking Structural Readiness

Accurate building opening measurements come first. Installers check width, height, squareness, and flatness at several points and compare them with the glazing manufacturer’s required glazing installation tolerances. Panels are typically fabricated to the field measurements, so errors here can mean remanufacturing.
Structural readiness matters equally. The supporting frame, slab edges, anchors, and mullions must be able to carry the glass and any wind loads, and they must be complete and correctly aligned. The engineer of record and the glazing manufacturer’s documents define what “ready” means for a given system.
Reviewing Access Routes and Delivery Requirements
Site access planning covers how panels travel from the truck to the opening. Crews examine door widths, corridor turns, elevator capacity, stair limits, ground conditions, and overhead obstructions. On upper floors, they also consider whether an exterior hoist, crane, or glazing robot is needed.
Planning the unloading area is part of this step. Panels need a stable, level staging location that protects them from traffic and weather.
Protecting Floors, Frames, and Surrounding Finishes
Protective coverings are placed over floors, thresholds, and completed surfaces, while frame openings are thoroughly inspected and cleaned to remove debris, sharp edges, or other potential hazards. Protecting the surrounding finishes prevents damage to the building. It also keeps loose grit from contacting the glass during setting. Protecting walls and finished surfaces is an important part of successful home improvement work. Similar care is needed when installing wall-mounted shelves, where accurate measurements and secure fitting help prevent surface damage and create a neat, finished appearance.
Glass Panel Transportation, Delivery, and On-Site Storage
Glass panel transportation is a risk point of its own. Panels are normally shipped upright on specialized racks, with separators and edge protection. Laying large panels flat or leaning them against walls is a common cause of breakage.
On arrival, installers inspect the packaging and the glass for transit damage and note any problems before accepting delivery. Storage should be dry, level, and out of the path of vehicles and workers. Follow the manufacturer’s guidance on stacking, ventilation, and protection from moisture trapped between panels.
What Equipment Is Used to Install Oversized Glass Walls?
Equipment selection depends on panel dimensions, weight, site access, wind conditions, lifting capacity, and the approved lifting plan. No single tool suits every project.
Vacuum Glass Lifters and Suction Handling Systems

A vacuum glass lifter uses suction cups to grip the glass surface, letting an operator lift, rotate, and position a panel without touching its edges. Quality systems include vacuum monitoring, alarms, and backup reserves so a loss of pressure is detected quickly. The lifter’s rated capacity must exceed the panel weight, and the glass surface must be clean and suitable for suction.
Cranes, Glazing Robots, and Specialized Lifting Equipment
Crane-assisted glazing is common for large or high-elevation panels, usually with a vacuum lifter or spreader attached to the hook. Glazing robots, which are compact, mobile manipulators, help position heavy panels precisely, especially indoors or in tight spaces. Other options include mini-cranes, manipulators, and hoists. Operators must be qualified for the specific equipment.
Protective Padding, Spacers, and Installation Tools
Smaller items matter too: edge guards, soft padding, glass setting blocks, shims, spacers, and non-marring tools. Setting blocks support the panel’s weight at the correct locations, while spacers and shims maintain consistent gaps. Tools that could scratch or chip the edge should never contact the glass.
Step-by-Step Process for Installing Oversized Glass Walls
The exact sequence varies by glazing system, but the following outlines how a careful crew works.
Step 1: Inspecting and Preparing Each Glass Panel
Before lifting, crew members check each panel for chips, scratches, edge damage, and correct dimensions and labeling. Damage found on the ground costs far less than damage discovered after installation. The glass and mounting surfaces are cleaned so suction cups seal properly and no debris is trapped.
Step 2: Positioning the Lifting Equipment
The lifting equipment is placed on stable ground, and the exclusion zone is established. Operators confirm the lifter’s capacity, the suction cup placement, and the correct lifting points. Cups are positioned to balance the panel and avoid stress concentrations.
Step 3: Lifting and Moving the Glass Safely

The panel is raised slightly first and checked for stability, vacuum level, and balance before full movement. Movement is slow and controlled, with a trained signal person coordinating. Crews use tag lines or guides where appropriate to prevent swinging. If the vacuum indicator drops or conditions change, the lift stops.
Step 4: Aligning the Panel With the Glazing System
During glass panel alignment, the crew guides the panel toward the opening without forcing it. Reference marks, laser levels, and careful shimming help hold the panel plumb and level within the allowed tolerances. If the panel does not fit smoothly, it should be lifted away and the opening rechecked rather than pushed into place.
Step 5: Securing the Panel and Completing the Installation
The panel is set on its setting blocks, then secured with pressure plates, stops, gaskets, or structural silicone, depending on the system. Fasteners are tightened to manufacturer specifications. Glazing gaskets and structural silicone sealant must be compatible with the glass and frame, and the product instructions govern application, cure times, and joint dimensions.
Step 6: Inspecting Seals, Alignment, and Final Finish
Once installed, the crew checks alignment, joint widths, gasket seating, and sealant continuity. Surfaces are cleaned, protective films handled as directed, and any visible defects documented. The inspection should be completed before the crew demobilizes.
How Professionals Prevent Glass Damage During Installation
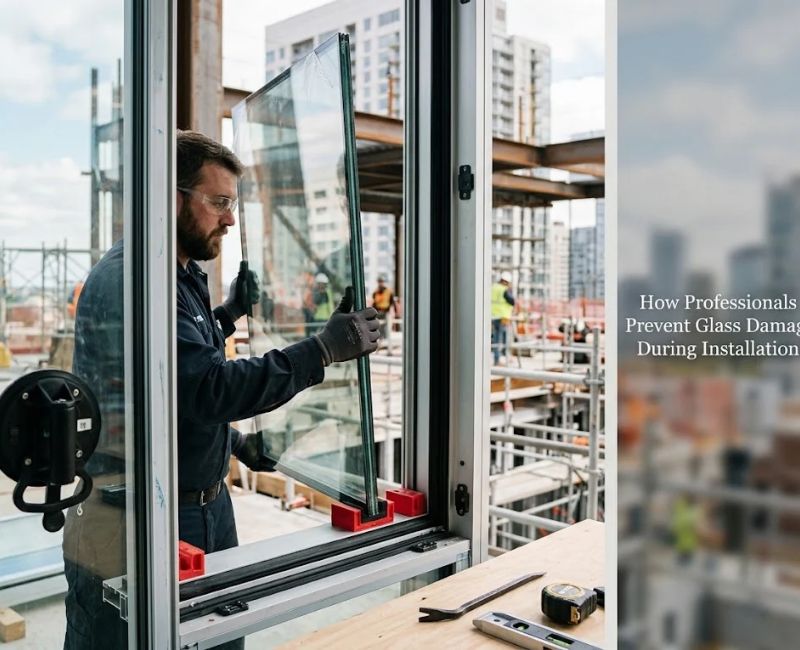
Glass panel breakage prevention is mostly a matter of discipline in a few areas:
- Handling procedures: Written procedures define who does what, with communication signals agreed in advance.
- Edge protection: Edges are padded, and panels are never set down on bare concrete or steel.
- Controlled movement: Slow, steady lifts avoid swinging, impact, and twisting.
- Correct lifting points: Suction cups or lifting devices are placed according to the manufacturer’s and equipment supplier’s guidance.
- Suitable suction equipment: The lifter is rated for the weight, and its vacuum alarms are tested and working.
- Frame tolerances: Openings are verified before the glass is lifted, not while it hangs from the crane.
- Prevention of glass-to-metal contact: Setting blocks, gaskets, and spacers keep glass from touching hard surfaces. The same attention to precise measurements, careful handling, and secure fitting is important in other glass installations around the home. For a related project, learn how to install a frameless shower door while maintaining proper alignment and protecting the glass from damage.
Common Installation Mistakes That Can Damage Oversized Glass Walls
Several recurring errors cause most avoidable damage:
- Inaccurate measurements: Panels fabricated to wrong dimensions may not fit or may bind in the frame.
- Inadequate access planning: Discovering at delivery that a panel cannot reach the opening leads to improvisation, which is when accidents happen.
- Unsuitable lifting equipment: Using undersized or poorly maintained suction equipment risks a dropped panel.
- Improper storage: Panels left leaning, wet, or in traffic lanes are easily damaged.
- Poor edge protection: Unprotected edges chip on contact with metal or concrete.
- Rushed positioning: Forcing a panel to fit can crack it or damage the seals.
- Incorrect sealant application: Wrong products, contaminated surfaces, or incorrect joint sizes can lead to leaks or failed bonds.
Installation Methods for Oversized Glass Walls
Choosing a method depends on panel dimensions, weight, site access, wind conditions, lifting capacity, and the approved lifting plan. Heavy glass panels should never be lifted manually without a professional assessment.
| Installation method | Suitable applications | Main advantages | Important limitations | Key safety considerations |
| Manual handling with an appropriate professional team, where permitted by panel weight and risk assessment | Smaller or lighter panels; limited areas where equipment cannot reach | Flexible; minimal equipment; suitable for tight spaces | Limited by weight and size; higher risk of strain and edge damage | Requires a documented risk assessment; trained crew; proper glazing grips and protective gear |
| Vacuum lifting equipment | Medium to large panels at ground level or interior spaces | Grips the surface, keeping hands off edges; precise control | Needs clean, suitable glass surface; limited by rated capacity | Vacuum monitoring and alarms; regular inspection; never exceed rated load |
| Glazing robots | Heavy panels in tight or interior spaces; repetitive installations | Precise positioning; reduces physical strain | Needs adequate floor conditions and access; equipment availability varies | Trained operators; stable floor surface; clear exclusion zones |
| Crane-assisted installation | Very large or heavy panels; upper floors; exterior installations | Handles the largest panels and elevated locations | Wind-sensitive; requires space, permits, and coordination | Engineered lifting plan; qualified operator and signal person; stop in unsafe wind |
What Affects Installation Cost, Time, and Risk?
Estimates vary by location, project specifications, glazing type, labor, and equipment availability, so exact prices and durations should come from a qualified glazing contractor.
| Installation factor | Potential effect on cost | Potential effect on installation time | Damage or safety risk | Practical way to reduce the risk |
| Panel dimensions and weight | Larger, heavier panels generally require more costly equipment and fabrication | Slower handling and positioning | Greater risk of breakage and handling accidents | Confirm lifting capacity early; use engineered lifting plans |
| Building access and floor level | Upper floors or tight access may add equipment and logistics costs | Longer staging and hoisting | Higher risk of impact during transit | Complete site access planning before delivery |
| Crane or glazing robot requirements | Equipment rental, operators, and permits add cost | Setup and coordination add time | Risks from overhead lifts and equipment failure | Use qualified operators; inspect equipment; define exclusion zones |
| Frame preparation and structural tolerances | Rework or remanufacturing is expensive | Corrections delay the schedule | Poor fit can stress or crack glass | Verify the opening dimensions before fabrication and again before lifting |
| Weather and wind exposure | Delays can raise standby and rescheduling costs | Weather holds interrupt lifting | Strong winds can make oversized glass panels harder to handle and control safely. | Set wind limits in advance; stop lifting when limits are exceeded |
| Number of panels and installation complexity | More panels and unique conditions can increase labor needs | More steps and coordination | More handling events increase cumulative risk | Sequence work carefully; standardize procedures; brief the crew |
How to Choose the Right Glass and Glazing System
Glass selection must comply with project specifications, applicable building codes, safety-glazing requirements, structural design, and manufacturer instructions. Glass types are not interchangeable.
Tempered, Laminated, and Insulating Glass Options
Tempered safety glass is heat-treated for greater strength and breaks into small fragments. Laminated glass panels bond layers with an interlayer that holds the glass together if it cracks, which helps with safety and security. Insulating glass units improve thermal performance and are often combined with tempered or laminated layers. The right choice depends on location, height, loads, and code requirements, which the project designer determines.
Frame Compatibility, Gaskets, and Sealants
The frame, glass, gaskets, and sealants must work as a system. Structural silicone sealant, glazing gaskets, and setting blocks should be compatible with the glass coatings and with each other. Replacing specified materials with unapproved alternatives may reduce system reliability and invalidate the manufacturer’s warranty.
Installing Oversized Glass Walls in Existing Buildings
Retrofitting is possible but usually more constrained than new construction. Existing openings may not be square, and surrounding finishes, occupants, and utilities must be protected. Structural capacity must be verified because the new glass may weigh more than what it replaces.
Access is often the biggest challenge. Panels may need to be brought in through windows, with cranes or hoists, or by robots working in confined interiors. A site survey and a documented plan are even more important in occupied buildings.
Working With a Qualified Glazing Contractor
A reliable glazing contractor can show relevant experience with large-format glazing, trained crews, maintained equipment, and appropriate insurance. Ask how they handle site surveys, lifting plans, and risk assessments, and ask which manufacturer documents they follow. Verify credentials directly rather than relying on claims in marketing materials.
Lifting operations should be performed by appropriately trained and qualified operators. Clear roles and communication among the glazier, crane operator, signal person, and site supervisor reduce the chance of confusion during a lift.
Weather, Site Conditions, and Installation Safety
Large glass panels can act like sails in the wind. A gust that seems modest can push a suspended panel off course, so lifting should stop whenever conditions exceed the limits in the approved plan. Rain, cold, and heat affect surfaces and sealants as well. Wet glass can reduce suction grip, and some sealants have temperature and moisture limits for application.
Good site coordination keeps other trades out of the lift zone. Exclusion zones, barriers, and signage protect workers and the public. Ground conditions should be checked for stability, especially when cranes or heavy equipment are involved. Safe lifting procedures include testing equipment, confirming communication signals, and having a plan for stopping a lift.
How to Inspect Oversized Glass Walls After Installation

Post-installation inspection should cover:
- Visible damage: Scratches, cracks, chips, or stains on the glass surface.
- Edge and corner condition: Small chips at edges and corners may signal future failure.
- Panel alignment: Consistent joint widths and plumb, level panels.
- Support blocks: Setting blocks correctly placed and seated.
- Gaskets: Properly seated and free of gaps, twists, or tears.
- Sealant continuity: Smooth, continuous beads with no voids or poor adhesion.
- Hardware operation: Doors, sliders, or operable units working smoothly.
- Documentation: Photos, checklists, and records of inspections and any corrections.
Structural and water-resistance testing should follow the project specifications when required. Where specified, these tests are typically performed by qualified testing agencies.
Documentation and Handover
Good records protect the owner and the contractor. Handover documents often include installation records, product data, warranty information, and maintenance guidance. Owners should receive cleaning and care instructions suited to the glass type and coatings, because harsh tools or chemicals can damage surfaces.
Frequently Asked Questions
How are oversized glass walls lifted into position?
Installers typically use vacuum lifters, glazing robots, or cranes with suction attachments, depending on panel size and site access. The panel is lifted slightly to test stability, moved slowly, and guided into place by a trained crew. The approved lifting plan defines the equipment, lifting points, and weather limits.
How do installers prevent large glass panels from breaking?
They protect edges, avoid glass-to-metal contact, and verify the opening’s dimensions before lifting. Controlled movement, correct lifting points, and properly rated suction equipment reduce stress on the panel. Panels are also inspected before and after installation to catch hidden damage.
What equipment is needed to install oversized glass walls?
Typical installation equipment includes vacuum lifting devices, cranes, robotic glass handlers, support blocks, alignment shims, edge guards, and tools designed to prevent surface damage. The right combination depends on panel weight, dimensions, site access, and wind conditions. A qualified contractor should confirm the lifting capacity and provide a lifting plan.
Can oversized glass walls be installed in existing buildings?
Yes, in many cases, but the structure and access must be assessed first. The opening must be able to support the load, and a delivery route has to be planned. A site survey by a qualified glazing contractor and, where required, a structural engineer helps determine feasibility.
How long does it take to install an oversized glass wall?
There is no single answer, because duration depends on the number and size of panels, site access, weather, equipment, and system type. Preparation, fabrication lead time, and inspections can matter as much as the lifting itself. A contractor can provide a schedule based on the project’s specifics.
What should be inspected after a large glass wall is installed?
Check for visible damage, edge and corner condition, panel alignment, support blocks, gaskets, sealant continuity, and hardware operation. Review documentation and any required structural or water-resistance test results. Report any defects to the contractor promptly.
Conclusion
Successful oversized glass wall installation rests on a few essentials: accurate measurements, suitable lifting equipment, trained professionals, properly prepared structures, and careful final inspections. Each step protects the glass from the stresses that cause breakage, from transit and storage to alignment and sealing.
Owners and project teams get the best results by planning early, choosing a qualified glazing contractor, and following building codes, site risk assessments, and manufacturer documentation. With that groundwork, large glass panels can be installed safely and look as intended for years.

Welcome to Cozy Escape Hub! I am Muhammad Hassaan, an AI Powered SEO and content writer with a 2 years of experience.
I help websites rank higher, grow traffic , and look amazing. My goal is to make SEO and web design simple and effective for everyone. Let’s achieve more together!